To make a configurable sparkle emitter in Roblox Studio, put a ParticleEmitter inside an Attachment beneath a Part, assign a sparkle texture, and choose how new particles should appear. Use Enabled and Rate for continuous emission, Emit for a requested burst, and Clear when you want to remove particles already alive.
Choose ParticleEmitter or the simpler Sparkles object
The Sparkles reference describes a simpler effect with fewer customization properties. If you want the lifetime, texture, and explicit burst behavior used in this exercise, choose ParticleEmitter. The two classes do not expose interchangeable APIs.
For this guide, the goal is a small fixed-origin test: observe continuous sparkles, stop the source, clear survivors, request one burst, then clear again. Establish that sequence before attaching the effect to a character or a gameplay reward.
Create the origin in a practice place
The particle-emitter guide explains the parenting distinction: an Attachment gives you a defined emission point, while parenting directly to a BasePart uses its emission area or shape. This exercise creates an anchored Part with an Attachment two studs above its center.
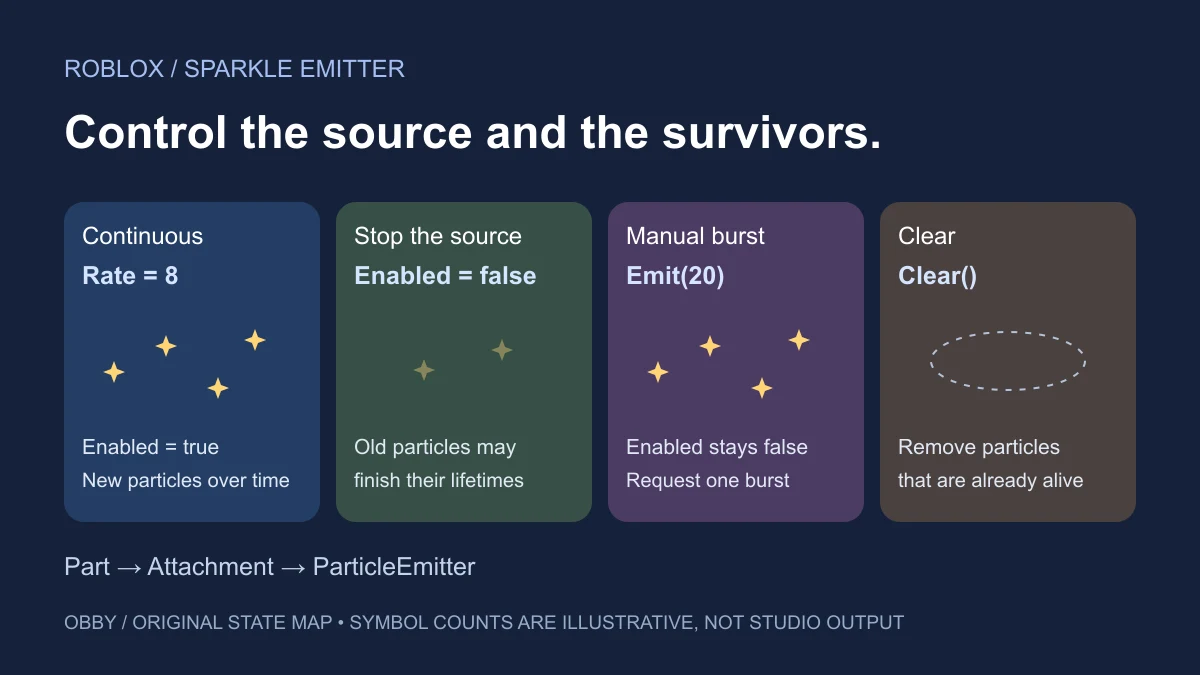
You can inspect the same hierarchy manually in Explorer: Part → Attachment → ParticleEmitter. If you insert an emitter manually, inspect its current Enabled and Rate settings before starting a controlled comparison. The script below configures the emitter before parenting it into the scene.
Use the built-in sparkle texture
The example assigns rbxasset://textures/. Roblox’s official Beam example identifies this path as a built-in sparkle texture. The same texture file is present in the installed Studio resources checked for this guide.
This is an engine-content path, rather than a numeric image asset ID to paste into a Marketplace search. Keep the spelling intact when testing it. If you later replace it with your own texture, verify the image and its transparent background separately so a texture problem does not become confused with emission timing.
Run a complete continuous-and-burst experiment
Use a new practice place, add a regular Script to ServerScriptService, open Output, and paste the following code. It creates its own visible test Part and Attachment near the origin. Move the camera close enough to inspect SparkleOrigin above the Part.
local folder = Instance.new("Folder")
folder.Name = "SparkleEmitterPractice"
folder.Parent = workspace

local part = Instance.new("Part")
part.Name = "SparkleDemo"
part.Size = Vector3.new(6, 1, 6)
part.Position = Vector3.new(0, 1, 0)
part.Anchored = true
part.CanCollide = false
part.Color = Color3.fromRGB(50, 95, 170)
part.Parent = folder

local origin = Instance.new("Attachment")
origin.Name = "SparkleOrigin"
origin.Position = Vector3.new(0, 2, 0)
origin.Parent = part

local emitter = Instance.new("ParticleEmitter")
emitter.Name = "PracticeSparkles"
emitter.Enabled = false
emitter.Texture = "rbxasset://textures/particles/sparkles_main.dds"
emitter.Color = ColorSequence.new(
    Color3.fromRGB(255, 213, 103),
    Color3.fromRGB(255, 245, 209)
)
emitter.LightEmission = 0.6
emitter.LightInfluence = 0
emitter.Lifetime = NumberRange.new(1.5, 2)
emitter.Rate = 8
emitter.Speed = NumberRange.new(1, 3)
emitter.SpreadAngle = Vector2.new(35, 35)
emitter.EmissionDirection = Enum.NormalId.Top
emitter.TimeScale = 1
emitter.Size = NumberSequence.new({
    NumberSequenceKeypoint.new(0, 0.35),
    NumberSequenceKeypoint.new(1, 0.05),
})
emitter.Transparency = NumberSequence.new({
    NumberSequenceKeypoint.new(0, 0),
    NumberSequenceKeypoint.new(0.7, 0.2),
    NumberSequenceKeypoint.new(1, 1),
})
emitter.Parent = origin

task.wait(1)
print("Continuous emission begins")
emitter.Enabled = true
task.wait(3)

emitter.Enabled = false
print("New continuous emission stopped; old particles can finish")
task.wait(0.5)
emitter:Clear()
print("Existing particles cleared")

task.wait(1)
emitter:Emit(20)
print("Burst requested while Enabled is false")
task.wait(0.5)
emitter:Clear()
print("Burst particles cleared")
The script is documentation-reviewed and has not been verified in a Studio run. The timeline below describes the intended control changes, not a recorded particle count or frame-accurate capture.
Read each phase as a separate operation
| Phase | Control | What to inspect |
|---|---|---|
| Continuous | Rate=8 and Enabled=true | New particles appear over time |
| Stop the source | Enabled=false | Existing particles can remain until their lifetimes finish |
| Clear survivors | Clear() | Particles already alive are removed |
| Manual burst | Emit(20), still disabled | One requested burst, without turning continuous emission on |
| Clear again | Clear() | The remaining burst particles are removed |
The ParticleEmitter reference defines these operations. In particular, stopping new continuous emission and removing existing particles are distinct actions. Clear does not itself change the emitter’s Enabled or Rate values.
The waits separate the observations. They do not provide a frame-accurate clock or guarantee that every client has finished loading an effect. If the source is not yet visible on a test client, confirm the hierarchy and texture before evaluating a timed burst.
Understand Rate, Lifetime, and sequence time
Rate describes continuous particles per second while emission is enabled. Lifetime chooses how long newly emitted particles stay alive. Changing Lifetime does not retroactively assign a new age limit to every particle already emitted.
The Transparency sequence uses normalized particle age. Its final keypoint at 1 means the end of each particle’s lifetime, rather than one second after the script started. The Size sequence follows the same relative-age idea. Separate that per-particle progression from the script’s waits between phases.
In this recipe, Lifetime spans 1.5 to 2 seconds and TimeScale is 1. The half-second pauses before Clear intentionally give you a different observation from waiting for every particle to expire naturally. Do not use the diagram’s decorative star count as an expected output.
Change one property while keeping the test readable
Start by changing either Rate or the Emit count, then repeat the scene. Next inspect Lifetime, Speed, or SpreadAngle. Changing all of them at once makes it harder to tell which choice affected the result.
Test at normal gameplay distance and at the quality levels you intend to support. A texture that is recognizable close to the camera may become difficult to read farther away. The result also depends on rendering settings and overlapping transparent effects, so a small requested particle count is not a performance measurement.
For a different texture and a short action cue, continue with the dust-particle burst guide. It keeps the broad particle setup and dust-specific recipe in their existing guide.
Diagnose a missing sparkle or an effect that will not stop
- Nothing appears: inspect the emitter’s parent, texture path, Lifetime, Transparency, and camera position.
- The continuous phase is missing: check Enabled and a nonzero Rate on the intended emitter.
- Particles survive disabling: compare remaining lifetime with the deliberate Clear call.
- New particles return after Clear: inspect whether continuous emission is still enabled or another caller requests a burst.
- Methods or properties are missing: confirm that the selected object is a ParticleEmitter rather than Sparkles.
- The burst is hard to observe: verify the already-present source and texture, then separate the burst from its cleanup while testing.
Use script search to locate other callers, and the task-library guide to reason about scheduled work. For repeat triggers, the debounce guide separates event frequency from accepted actions. Documentation checked November 9, 2026.