What Is Roblox Creator Studio?
Roblox Creator Studio — often just called "Roblox Studio" — is the official, free development environment where every Roblox game is built. It's a 3D game editor, script editor, terrain generator, animation tool, and publishing platform all in one application. Whether you're building a simple obstacle course or a complex RPG with hundreds of systems, it all happens in Studio.
Studio is available for free to any Roblox account holder and runs on both Windows and macOS. You don't need to buy anything to start building. You never have to pay to publish your game on Roblox.
System Requirements
Most modern computers handle Roblox Studio comfortably:
- Windows: Windows 7 or later (Windows 10/11 strongly recommended), 4GB RAM minimum (8GB+ recommended for complex projects), DirectX 10 or later, dedicated GPU preferred
- macOS: macOS 10.13 (High Sierra) or later, 4GB RAM minimum
- Internet connection: Required for publishing, team collaboration, and accessing cloud assets
If your computer is slow when Studio is open with a large game, close other applications, reduce the render quality in Studio's settings, and consider upgrading RAM. 16GB RAM makes a noticeable difference for large, asset-heavy projects.
How to Download and Install Roblox Studio
- Visit create.roblox.com in your browser
- Click the Start Creating button
- Download the Studio installer for your operating system
- Run the installer — it takes 1–3 minutes
- Launch Roblox Studio and sign in with your Roblox account
Studio auto-updates itself. You'll always have the current version without manually checking for updates.
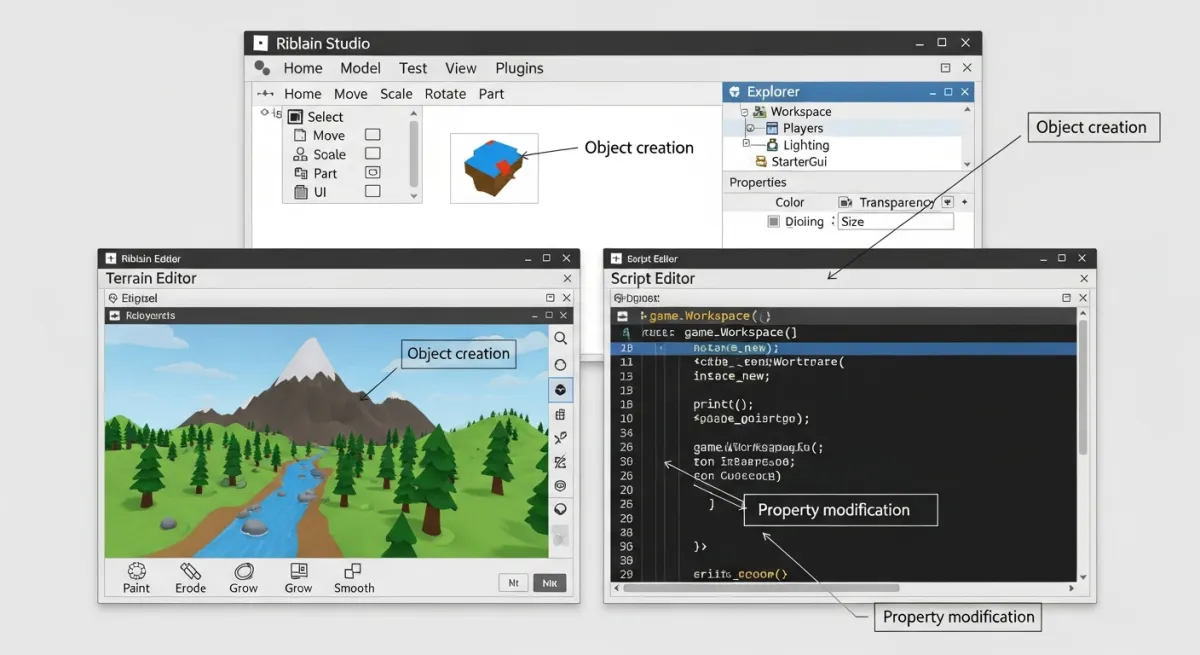
The Roblox Studio Interface: A Complete Walkthrough
The Toolbar (Top)
The top toolbar contains your primary editing tools organized into tabs:
- Home tab: Common tools — Part insertion, Select/Move/Scale/Rotate, Playtest buttons
- Model tab: Insert models, constraints, attachments, and configure part properties
- Terrain tab: Access the Terrain Editor for sculpting landscapes
- Test tab: Simulation controls, emulation settings
- View tab: Toggle panels, change Studio layout
- Plugins tab: Manage and activate installed plugins
The Viewport (Center)
This is your 3D game world. Navigate using:
- Right-click + drag: Look around (rotate the camera)
- W/A/S/D: Move the camera forward/left/back/right while holding right-click
- Q/E: Move camera up/down
- Scroll wheel: Zoom in/out
- F key: Focus the camera on the selected object
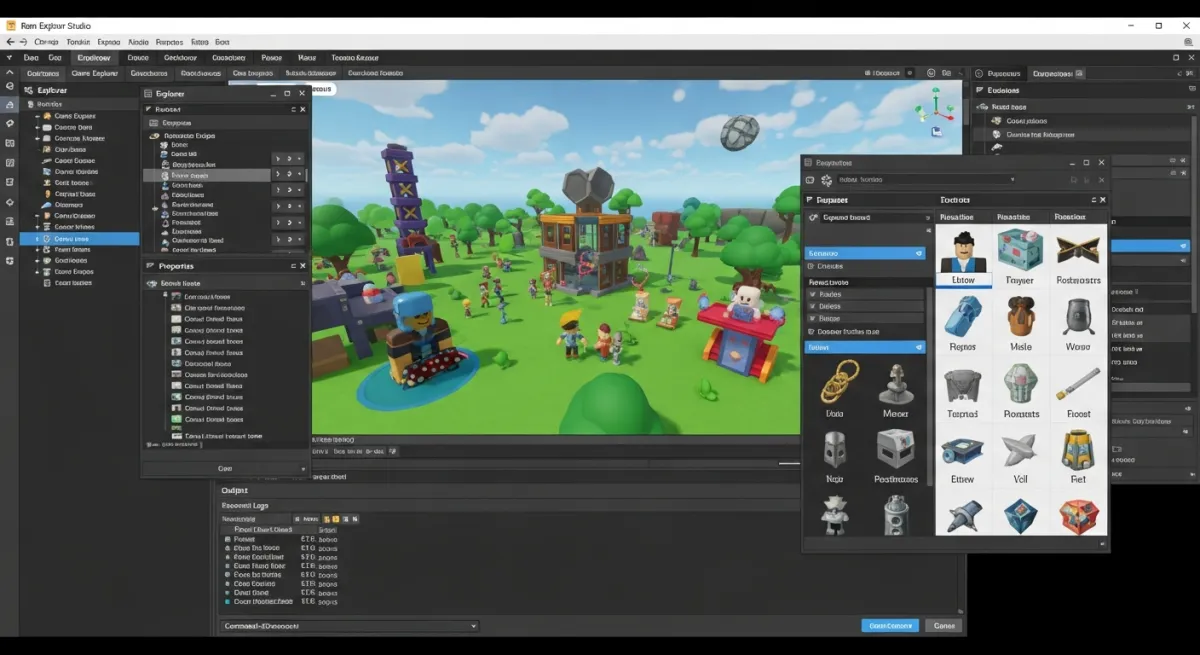
The Explorer Panel (Right Side, Top)
The Explorer is the hierarchy of everything in your game — every Part, Model, Script, UI element, Sound, and Roblox Service. Think of it as your game's organizational tree. Critical containers to know:
- Workspace: The 3D game world — parts, terrain, and spawns live here
- ServerScriptService: Server-side scripts that run on Roblox's servers
- StarterPlayerScripts: Client-side scripts that run for each player
- StarterGui: UI elements that are cloned to each player's screen
- ServerStorage: Objects stored on the server, not accessible to clients
- ReplicatedStorage: Objects accessible to both server and clients
To add an object anywhere: right-click on the parent container in Explorer > Insert Object > select the type.
The Properties Panel (Right Side, Bottom)
When you select any object, its Properties panel shows all configurable attributes. For a Part, you'll see:
- Size (X, Y, Z dimensions)
- Position (world coordinates)
- BrickColor and Material
- Anchored (checked = the part won't fall due to gravity)
- CanCollide (unchecked = players and objects pass through it)
- Transparency (0 = opaque, 1 = invisible)
Most common beginner mistake: not checking Anchored. Always anchor parts that should be stationary — walls, floors, platforms, decorations. Unanchored parts fall through the world when the game runs.
The Script Editor
Double-click any Script or LocalScript in the Explorer to open the code editor. Features include:
- Syntax highlighting for Luau
- Basic autocomplete for Roblox APIs
- Multiple script tabs open simultaneously
- Find and replace (Ctrl+F)
Tip: Open multiple scripts side by side by right-clicking a script tab and selecting "Move to New Window."
The Output Window (Bottom)
During playtesting, every print() statement and every runtime error appears here. This is your primary debugging tool. Learn to read error messages — they tell you the script name, line number, and what went wrong. Always have the Output window visible when testing.
Core Building Tools
The four tools you'll use constantly (keyboard shortcuts):
- Select (V): Click to select objects, drag to box-select multiple
- Move (W): Drag the colored arrows to move selected objects on specific axes
- Scale (E): Drag the colored handles to resize objects
- Rotate (R): Drag the colored rings to rotate objects on each axis
Use the Snap settings (next to the tool buttons) to control how precisely parts snap to the grid. Smaller snap increments give more precise control; larger snaps keep things aligned to a clean grid.
Key Features of Roblox Studio
Terrain Editor
The Terrain Editor (Terrain tab) lets you sculpt realistic 3D landscapes instead of placing individual blocks. You can:
- Generate: Create automatic terrain from presets (hills, mountains, canyons)
- Sculpt: Raise, lower, smooth, and flatten terrain by painting with your cursor
- Paint: Apply materials (grass, sand, water, rock, snow) to terrain surfaces
- Fill: Fill enclosed regions with specific terrain materials
Team Create (Real-Time Collaboration)
Team Create allows multiple developers to edit the same game simultaneously — like Google Docs for Roblox. Enable it via the View tab. Ideal for game studios or co-development projects. Requires everyone to have Studio connected to the same Roblox account or be invited to the team.
Asset Toolbox
The Toolbox (View > Toolbox) gives you access to:
- Millions of free community 3D models
- Decals and images
- Audio files (music, sound effects)
- Plugins from the community
- Animations
Always preview assets before inserting — some community-uploaded models contain scripts. Check the scripts tab of any inserted model before publishing.
Animation Editor
Create custom character and NPC animations directly in Studio using a keyframe-based system. Access it via the Plugins tab after it's activated. Essential for creating unique character attacks, emotes, or NPC movement cycles.
Essential Roblox Studio Plugins in 2026
Plugins extend Studio's capabilities. Install them from the Toolbox (Plugins category) or the Roblox Plugin Marketplace at create.roblox.com. These are widely used and trusted by the developer community:
- Studio Build Suite: Advanced building tools — alignment, distribution, stacking
- Part Picker: Select multiple objects by property (e.g., select all parts with a specific material)
- Tag Editor: Add and manage CollectionService tags on objects, useful for organizing game objects
- DataStore Editor: View and edit DataStore values during development for debugging save systems
- Rojo: Sync your Roblox Studio project with external code editors like VS Code for a more professional scripting workflow
Be cautious with plugins — only install from trusted creators with good reviews. A malicious plugin can interfere with your project.
Scripting Basics in Roblox Studio
Roblox Studio uses Luau, a typed, performant variant of Lua. It's one of the more beginner-accessible languages — readable syntax, no manual memory management, and a massive community of tutorials.
The Three Script Types
- Script: Runs on the server. Handles secure game logic — DataStore, combat damage, game pass checks, round management. Never trust data from clients in server scripts.
- LocalScript: Runs on the player's local machine. Handles UI, camera, client-side effects. Can access
game.Players.LocalPlayer. Cannot be seen by other players. - ModuleScript: A reusable code library. Neither server nor client — it runs wherever it's required. Use to share functions and data between scripts without copy-pasting code.
Essential Services to Know
game:GetService("Players")— access all players, listen for join/leave eventsgame:GetService("RunService")— per-frame events (Heartbeat, RenderStepped)game:GetService("DataStoreService")— persistent data saving and loadinggame:GetService("MarketplaceService")— game pass ownership, purchase promptsgame:GetService("TweenService")— smooth animations and transitionsgame:GetService("PathfindingService")— NPC navigation and pathfindinggame:GetService("ReplicatedStorage")— share RemoteEvents between server and client
Your First Script
Right-click on ServerScriptService in the Explorer, insert a Script, and paste this:
local Players = game:GetService("Players")

Players.PlayerAdded:Connect(function(player)
  print("Welcome to the game, " .. player.Name .. "!")

  -- Give the player a leaderstats board
  local leaderstats = Instance.new("Folder")
  leaderstats.Name = "leaderstats"
  leaderstats.Parent = player

  local coins = Instance.new("IntValue")
  coins.Name = "Coins"
  coins.Value = 0
  coins.Parent = leaderstats
end)
This creates a Coins leaderboard visible to all players when they join. Hit Play to test it.
Publishing Your Game
- In Studio: File > Publish to Roblox As
- Fill in name, description, genre, and age rating
- Add an icon (512x512 PNG recommended) and thumbnails
- Click Create
- Go to create.roblox.com, find your game, and set it to Public
Pro Tips for Roblox Studio Beginners
- Save constantly: Ctrl+S saves a local file. Also publish regularly via File > Publish to save to Roblox's cloud.
- Keep the Explorer organized: Use folders (right-click in Explorer > Insert Object > Folder) to group related parts. This pays dividends as your game grows.
- Use the DevHub: create.roblox.com/docs is Roblox's official API documentation. Whenever you need to know how a service or function works, the DevHub is the authoritative source.
- Join the DevForum: devforum.roblox.com is the best community resource — scripting help, platform announcements, feedback threads, hiring boards.
- Playtest often: Don't build for two weeks before hitting Play. Test after every significant change.
- Learn from popular games: Open uncopylocked games from the Toolbox to study how experienced developers structure their projects.
Accelerate Your Studio Workflow with AI
Even with all of Studio's tools at your fingertips, the scripting work is substantial. Obby can generate complete game systems — combat, DataStore, game pass integration, shop UI, leaderboards — that you import directly into Studio and customize. It's the fastest way to get from a blank baseplate to a working, polished game.


