To use EditableMesh in Roblox, create editable geometry through AssetService, add vertices and faces, then display that geometry through a MeshPart. Editing the linked geometry changes its appearance. A blank EditableMesh alone does not put a visible object in Workspace.
Choose the right mesh workflow
EditableMesh is for code that creates or changes geometry, such as a procedural surface or a deforming visual effect. If your goal is simply to bring a finished model into Studio, use the mesh upload and import workflow instead. An asset ID, a MeshPart, and editable vertex data serve different purposes.
This tutorial starts with a blank mesh so you can learn the relationship between four vertices, two faces, and one displayed object. It does not download another creator’s asset or generate a textured avatar accessory.
Check API access before debugging geometry
Roblox’s current EditableMesh reference says published games need Mesh / Image APIs enabled. In Creator Dashboard, open the game’s Configure → Settings and find Enable Mesh / Image APIs. The documented Studio alternative is Experience Settings → Security → Allow Mesh / Image APIs. Review the applicable terms and any account requirements presented there before enabling it.
Loading an existing asset with CreateEditableMeshAsync also requires appropriate ownership or explicit sharing, including qualifying group asset permissions. A visible marketplace listing or an ID copied from a website does not establish edit access. The blank example below avoids loading an external asset, but that does not bypass the game’s API access settings.
Build a four-vertex practice mesh
In a spare place, add a LocalScript under StarterPlayer → StarterPlayerScripts, paste the code, and start a play test. Look around world position 0, 8, 0 and read the client Output. This is a client-side visual exercise; it does not establish a shared multiplayer mesh or authoritative collision.
The example has been checked against the API documentation but has not been run in Studio for this guide. Treat the expected values as a test plan. First confirm that the initial quad appears, then watch its top-right corner move inward after three seconds.
-- LocalScript in StarterPlayer > StarterPlayerScripts.
-- Documentation-reviewed example; not executed in Studio for this guide.
local AssetService = game:GetService("AssetService")

local made, editable = pcall(function()
    return AssetService:CreateEditableMesh()
end)
if not made then
    warn("EditableMesh creation failed:", editable)
    return
end
if not editable then
    warn("No EditableMesh: editable memory budget may be exhausted")
    return
end

local v1 = editable:AddVertex(Vector3.new(-4, -2, 0))
local v2 = editable:AddVertex(Vector3.new(4, -2, 0))
local v3 = editable:AddVertex(Vector3.new(4, 2, 0))
local v4 = editable:AddVertex(Vector3.new(-4, 2, 0))
editable:AddTriangle(v1, v2, v3)
editable:AddTriangle(v1, v3, v4)

local displayed, part = pcall(function()
    return AssetService:CreateMeshPartAsync(Content.fromObject(editable))
end)
if not displayed then
    warn("MeshPart creation failed:", part)
    editable:Destroy()
    return
end
part.Name = "EditableQuadPractice"
part.Anchored = true
part.CanCollide = false
part.DoubleSided = true
part.Color = Color3.fromRGB(90, 155, 255)
part.Material = Enum.Material.SmoothPlastic
part.CFrame = CFrame.new(0, 8, 0)
part.Parent = workspace

print("Before:", editable:GetPosition(v3)) -- expected 4, 2, 0
-- Keep the editable object alive while its content is displayed.
task.wait(3)
editable:SetPosition(v3, Vector3.new(2, 1, 0))
print("After:", editable:GetPosition(v3)) -- expected 2, 1, 0
Understand the vertices and triangles
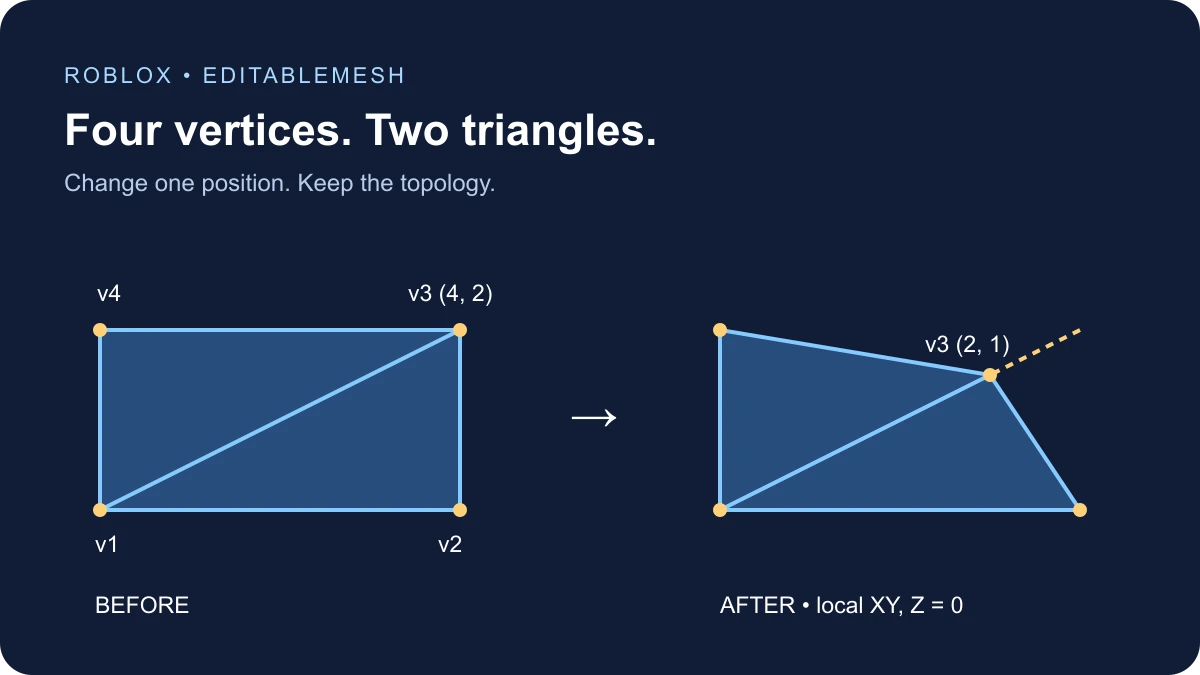
The four positions describe a flat rectangle in local XY coordinates, with Z equal to zero. The first triangle uses v1, v2, v3; the second uses v1, v3, v4. They share the diagonal from v1 to v3. Each variable stores the ID returned by AddVertex, not a position itself.
Roblox uses stable IDs that may have gaps. Do not assume a vertex is ID 1 simply because you added it first, or loop from one to a guessed maximum ID when editing an imported mesh. Keep returned IDs, or iterate the table returned by GetVertices.
The vertex order in both triangles gives a front side facing positive local Z. The API defines the front by counterclockwise winding when viewed from that side. DoubleSided is true here to make the first observation easier from either side; it does not fix incorrect topology or turn a flat surface into a solid object.
Compare the expected states
| Stage | Geometry | What to observe |
|---|---|---|
| After display | 4 vertices, 2 triangles | A flat blue quad near 0, 8, 0 |
| Before edit | v3 = 4, 2, 0 | Rectangle with a shared diagonal |
| After three seconds | v3 = 2, 1, 0 | Upper-right corner moves inward; same face IDs |
Only one vertex position changes. The other three corners retain the original overall X and Y bounds. That keeps the exercise focused on a shape edit rather than introducing a separate resizing experiment. The triangles remain nondegenerate: their signed double areas along local Z are 24 and 24 after the edit, compared with 32 and 32 initially.
Editable data and the MeshPart have different jobs
CreateEditableMesh returns the data object. Content.fromObject wraps a reference to it, and CreateMeshPartAsync creates the displayed part from that content. The part’s CFrame places the object in the world; vertex positions describe geometry in mesh space. See the CFrame guide when local and world coordinates are unfamiliar.
The code keeps the editable object available across the delayed edit. Do not destroy it immediately after connecting it to the part if you still intend to change its vertices. For a larger effect, design explicit cleanup for both the displayed part and editable data when the effect ends.
Handle nil results, errors, and memory budgets
The AssetService reference documents that blank creation can return nil when the device-specific editable memory budget is exhausted. That is why the example checks both the protected call result and the returned object. Display creation can throw, so that step has its own protected call and destroys the unused editable object on failure.
Start small on client devices. One successful desktop test does not prove a large procedural scene fits every player’s budget. Reuse editable content where appropriate and remove abandoned objects rather than repeatedly creating meshes in an uncontrolled frame loop.
Editing an existing mesh is a separate branch
For a permitted asset, CreateEditableMeshAsync loads existing content. Its default FixedSize setting is true: you can edit existing positions and attribute values, but cannot change the number of vertices, faces, or attributes. If your operation needs to add or remove geometry, request FixedSize = false and account for the extra memory cost. Blank meshes created by CreateEditableMesh are already non-fixed-size.
Do not replace the blank-creation line with an imported asset and keep the example’s vertex variables unchanged. An imported mesh has its own IDs, topology, dimensions, and attributes. Inspect those before deciding which vertices to move.
Visual edits do not automatically rebuild collision
Roblox documents immediate visual updates for a linked EditableMesh. Recalculating collision and fluid geometry is a separate operation involving CreateMeshPartAsync and MeshPart:ApplyMesh. Batch that work at the end of a conceptual edit rather than rebuilding after each changed vertex.
This practice part deliberately has CanCollide set to false. For a walkable surface, test collision separately and decide how the server and other players will receive the intended state. A client-only shape change is not proof of multiplayer replication or a safe gameplay boundary.
When the mesh does not appear
- Creation warning: read which step failed before changing vertex math. Check API access, asset permissions when loading assets, and client memory.
- No warnings, no visible object: confirm a MeshPart was parented to Workspace and look at the expected world location.
- Visible from only one side: inspect triangle winding and DoubleSided rather than adding duplicate faces blindly.
- The wrong corner moves: use the ID returned for that vertex and distinguish mesh-space coordinates from the part’s world CFrame.
- Texture looks wrong: this exercise has no texture mapping. Roblox stores UVs, normals, and colors per face corner; a good surface topology does not automatically provide useful UVs.
Once the two-triangle version works, add one feature at a time: explicit UVs, more vertices, or a controlled animation. Keep a small known-good mesh available so access failures and geometry bugs remain easy to distinguish.
Documentation reviewed November 17, 2026.