Roblox pathfinding works best when you separate three questions: can a route be computed, can the character follow it, and can your game recover when the route changes? Start with a tiny test map before connecting a monster chase, patrol schedule, or moving target.
Build a route you can explain
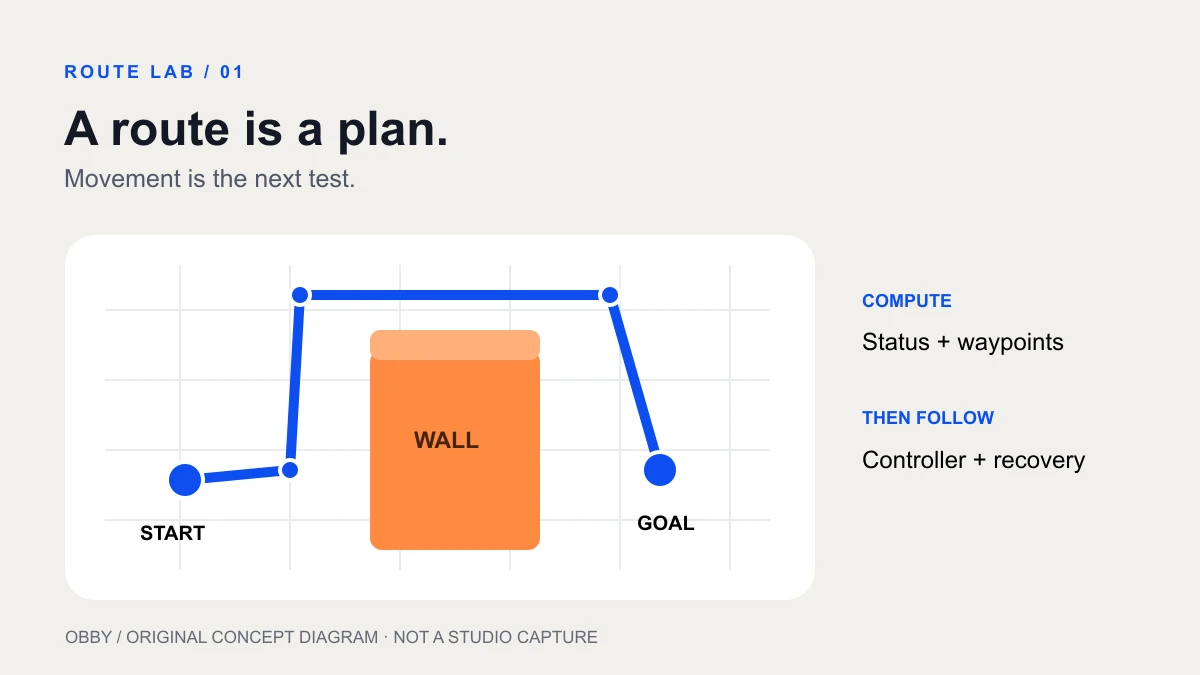
Make a practice place with a flat floor, one wall, and enough space to walk around either end. Add two small anchored marker Parts named RouteStart and RouteGoal on opposite sides. Turn their CanCollide off and position them just above the floor, outside the wall. Keep the floor and obstacle anchored.
Write your expected result before running anything: “The route should bend around the left or right end of the wall.” This gives you a concrete check. A busy horror map with dozens of doors makes it much harder to tell whether your first failure comes from geometry, character movement, or target selection.
Inspect the navigation mesh first
Open the 3D viewport’s Visualization Options and enable Navigation mesh. Roblox’s pathfinding guide explains the walkable areas and jump indicators. Look for a continuous connection between your markers. A visible floor is not by itself proof that your chosen agent can navigate the route.
Take a baseline screenshot of this small scene. Then make only one change: narrow a gap, add a low ceiling, or move the destination. Save the before-and-after result. That comparison is more useful than changing five agent settings at once.
Compute and inspect a path
Insert a regular Script in ServerScriptService and use this diagnostic exercise. It reads the two marker positions and prints the computed waypoint list in Output. It does not spawn or move an NPC.
local PathfindingService = game:GetService("PathfindingService")
local start = workspace:WaitForChild("RouteStart")
local goal = workspace:WaitForChild("RouteGoal")

local path = PathfindingService:CreatePath({
    AgentRadius = 2,
    AgentHeight = 5,
    AgentCanJump = false,
})

local ok, message = pcall(function()
    path:ComputeAsync(start.Position, goal.Position)
end)

if not ok then
    warn("Route computation failed:", message)
    return
end
if path.Status ~= Enum.PathStatus.Success then
    warn("No route with these endpoints and agent settings:", path.Status)
    return
end

local waypoints = path:GetWaypoints()
print("Route found. Waypoints:", #waypoints)
for index, waypoint in ipairs(waypoints) do
    print(index, waypoint.Position, waypoint.Action)
end
The current PathfindingService reference documents CreatePath. ComputeAsync calculates the route; GetWaypoints retrieves its ordered points. Keep an API error distinct from an unsuccessful route status so you know which problem to investigate.
Match the agent to the intended character
AgentRadius and AgentHeight describe clearance; they do not resize the rig. The exercise uses radius 2 and height 5, with jumping disabled to keep the first route easy to inspect. Those are exercise settings, not universal values for every NPC.
Measure the character you actually intend to use. Compare it with the doorway and overhead clearance. If the visual rig is much wider than the agent configuration, a computed route can still be unsuitable for the character’s physical movement. If your design needs jumping, introduce one controlled jump only after the flat route works.
Connect movement as a separate stage
A successful path result is a plan, not a movement command. Your controller must advance through the waypoints, process their actions, and recognize arrival. Use the movement implementation in Roblox’s pathfinding guide as a reference; its current sample controls the player character and has its own setup instructions. Do not drop that LocalScript into a server NPC and assume the execution context is interchangeable.
For your NPC controller, define what “finished” means before adding a chase loop. Start at a fixed position, follow one route, and stop at the destination. Then add a second destination. Finally, introduce a moving target. This progression exposes stale waypoint lists and competing movement commands while the test is still small.
Handle a blocked route without endless recomputation
Path.Blocked can report an obstruction after computation. Compare its waypoint index with the next waypoint your controller intends to reach; a new obstacle behind the character should not automatically restart its journey. Disconnect obsolete listeners when replacing a route.
Give the controller an explicit recovery policy: stop the old attempt, compute a replacement, and fall back to an idle or search behavior when no route exists. Avoid launching a fresh computation on every frame. Record when a retry is allowed and which active controller owns the character’s movement.
Use costs when two routes should feel different
A shorter route is not always the route your design wants. Material costs and labeled PathfindingModifier regions let you express preferences. Keep a plain route as a baseline, then introduce one expensive patch and compare the result. A preference does not operate a door or create a bridge; those interactions need their own game logic.
For example, design a quiet hallway and a noisy shortcut, then decide whether the monster should prefer one. Document the rule in your horror game plan. If the route reaches an interactive object, use a separate proximity prompt interaction for the player-facing action.
Keep a repeatable route test sheet
| Change | What to record | Next question |
|---|---|---|
| Open floor | Status and waypoint count | Does the basic setup work? |
| One wall | Route around the obstacle | Is the path connected? |
| Narrow doorway | Agent settings and opening size | Is clearance sufficient? |
| Obstacle added during movement | Blocked index and recovery | Did the controller replace its old route? |
| Moving target | Recompute timing and destination | Is the controller following current information? |
Use the Studio scripting tutorial if you need help locating scripts and reading Output. The exercise above was reviewed against the current documentation; run it in your own Studio test place before adapting it to gameplay. Documentation checked November 8, 2026.