Create a Tool in StarterPack, add an unanchored Part named Handle, and test equipping it before adding gameplay logic. A plain Part in StarterPack is not the same object as a Tool with a Handle.
Build the starter hierarchy
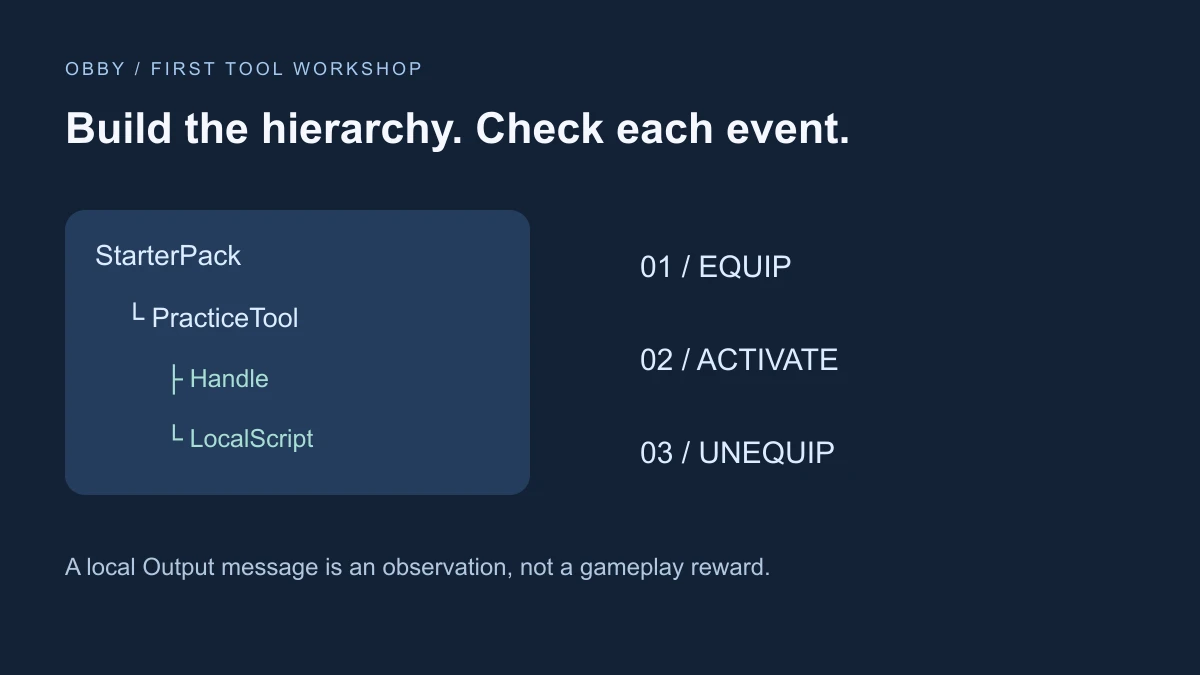
In Explorer, insert a Tool under StarterPack and name it PracticeTool. Add a Part directly inside it and name that Part Handle, preserving capitalization. Start with a small rectangular handle. Set Anchored to false and CanCollide to false so this first held-object test does not depend on unwanted collisions. Keep RequiresHandle enabled for this exercise.
Add a LocalScript directly under PracticeTool and paste the example below. The script checks its parent and handle, then reports equipment and activation events. It awards nothing and changes no server-owned gameplay state.
-- LocalScript directly inside PracticeTool in StarterPack.
-- Create its unanchored BasePart child named Handle first.
-- Documentation-reviewed exercise; not Studio-executed.
local tool = script.Parent
assert(tool:IsA("Tool"), "Place this LocalScript directly inside the Tool")
local handle = tool:WaitForChild("Handle", 5)
assert(handle and handle:IsA("BasePart"), "Add a BasePart named Handle")

local activations = 0
tool.Equipped:Connect(function()
    print("PracticeTool equipped")
end)
tool.Activated:Connect(function()
    activations += 1
    print("PracticeTool activation:", activations)
end)
tool.Unequipped:Connect(function()
    print("PracticeTool unequipped")
end)
print("PracticeTool ready: equip it, activate it, then unequip it")
Test three separate observations
Start Play with a player character. Confirm the Tool appears in the player's inventory, equip it, and look for the equipped message in client Output. Activate the equipped Tool with a normal click, then unequip it and check the final message. Do not hold Ctrl during the click: the current Tool API documents that Activated does not fire for that combination.
Repeat the sequence once. The activation counter belongs to this LocalScript instance, not to a saved inventory record. A printed count proves that handler ran on the client; it does not establish a successful purchase, hit, or reward.
Inspect runtime objects
The StarterPack reference documents that its contents are copied into every player’s Backpack when their character spawns. During playtesting, inspect the player's Backpack and character separately: the equipped Tool leaves the Backpack for the character. Make permanent setup edits to the source Tool outside the running test, then restart and compare. An edit to a runtime copy is a different operation.
Diagnose the first failure
If the Tool does not equip properly, inspect RequiresHandle and the direct child named Handle. If the ready message is missing, inspect the LocalScript's placement and Output errors. If equipping works but activation does not, verify Enabled and the input combination before rewriting the handler. Do not confuse equip, activate, and successful gameplay behavior.
Extend one feature at a time
After the starter test works, add a cosmetic change or animation as a separate experiment. A multi-part held object needs its pieces connected deliberately; use the bulk welding guide for rigid subparts. Test grip and collisions again after changing geometry.
For gameplay that affects other players or persistent data, treat client input as a request and validate it on the server. This diagnostic example is not a damage, commerce, or inventory persistence system.
Documentation reviewed November17,2026. Proposed exercise not executed in Studio.
Review the Tool API for equipment and activation requirements. For a rigid held object made of several pieces, continue with the bulk welding guide.