Roblox Studio: Your Free Game-Building Toolkit
Roblox Studio is the official tool for building Roblox games. It's free, powerful, and used by every Roblox developer — from hobbyists to studios earning millions. This tutorial teaches you how to build a game in Roblox Studio from absolute zero.
Getting Started with Roblox Studio
Download and Install
Visit create.roblox.com and click "Start Creating." Studio will download and install automatically. Log in with your Roblox account.
System requirements: Windows 7+ or macOS 10.13+. Studio does not run on Chromebooks, iPads, or phones. If you want to build on mobile, use a browser-based tool like Obby and export to Studio later.
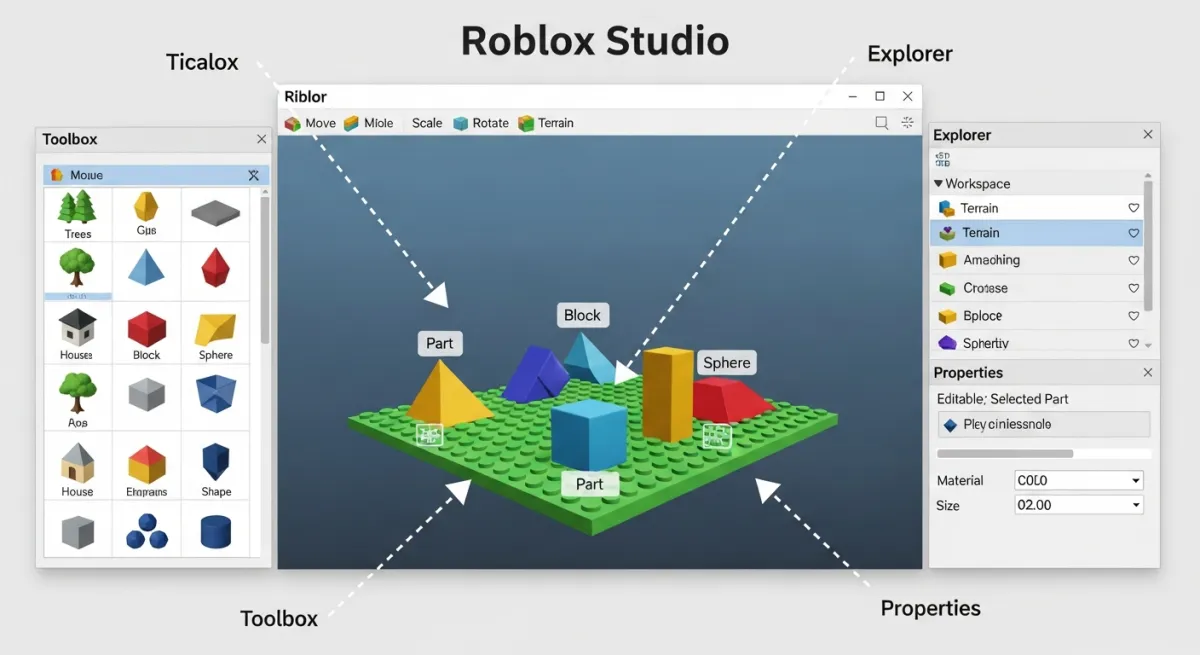
The Studio Interface
When you open Studio, you'll see:
- Viewport (center) — the 3D view of your game world
- Explorer (right) — tree view of every object in your game
- Properties (right) — settings for the selected object
- Toolbar (top) — move, scale, rotate tools and play/test buttons
- Toolbox (left, toggle with View menu) — free models and assets
Building Your First Game: Simple Obby
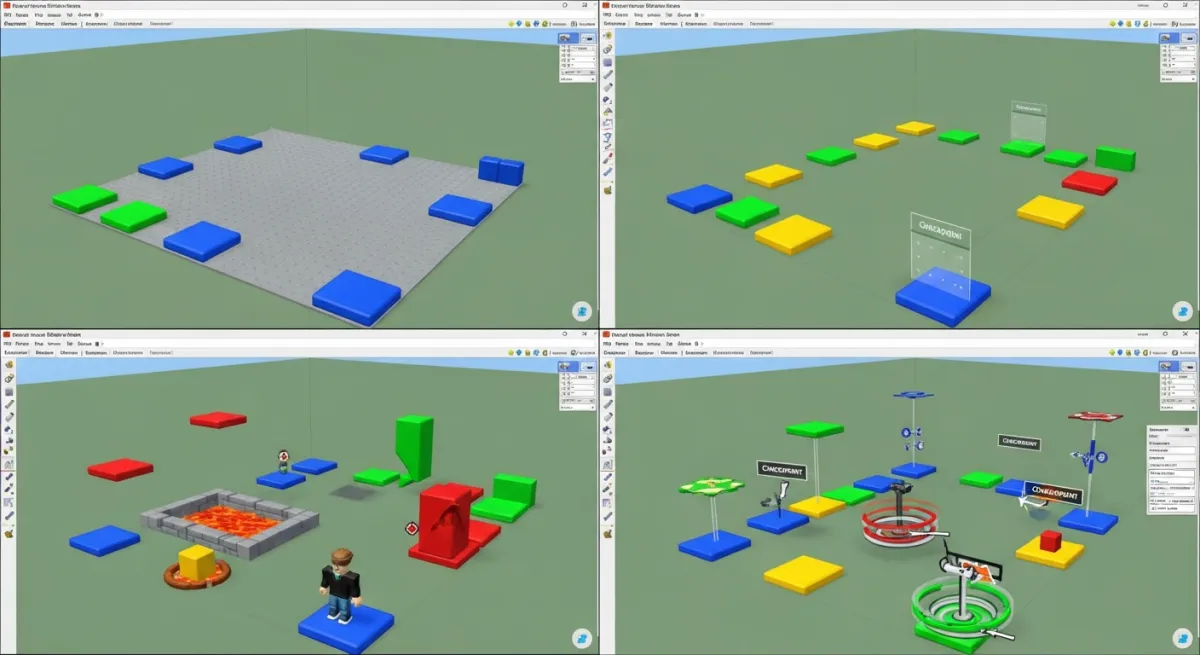
Let's build a working obby (obstacle course) step by step.
1. Create a New Place
Click "New" and select "Baseplate." This gives you a flat ground to build on.
2. Build Platforms
Click Part → Block in the toolbar to insert a new part. Use the Move, Scale, and Rotate tools to position it. Create a series of platforms with gaps between them — that's your basic obby.
Tips:
- Hold Ctrl+D to duplicate a part quickly
- Change colors in the Properties panel (BrickColor or Color3)
- Make platforms progressively harder — longer jumps, moving parts, narrower surfaces
3. Add Kill Bricks
Create a red part and add a Script inside it (right-click → Insert Object → Script):
script.Parent.Touched:Connect(function(hit)
  local humanoid = hit.Parent:FindFirstChild("Humanoid")
  if humanoid then
    humanoid.Health = 0
  end
end)
Now when a player touches the red brick, they respawn.
4. Add Checkpoints
Create SpawnLocation objects at key points in your obby. Players respawn at the last checkpoint they touched instead of the beginning. This prevents frustration on longer courses.
5. Add a Finish Zone
Create a glowing part at the end that triggers a win message. Use a script with a GUI popup or a badge award to celebrate completion.
Testing Your Game
Press F5 (or the Play button) to test. Your character spawns in the game and you can play through it. Press F5 again to stop testing.
Use F8 for team test (simulates multiple players) and check the Output window (View → Output) for script errors.
Publishing Your Game
- Go to File → Publish to Roblox
- Enter a name and description
- Set the game to Public (so others can find it)
- Upload an icon (512x512) and thumbnails
- Click Publish — your game is now live on Roblox
Building on Mobile (iPad/Phone)
Roblox Studio doesn't run on mobile devices. However, you have two options:
- Use a browser-based tool — Obby works in any browser, including mobile. Describe your game, preview it, and export a .rbxlx file to open in Studio on a PC/Mac later.
- Remote desktop — use apps like Chrome Remote Desktop to access a PC running Studio from your tablet.
How to Build a Good Roblox Game
Technical building is one thing — making a good game is another. Tips from successful developers:
- Hook players in 30 seconds — if the first minute isn't fun, players leave
- Add progression — levels, unlocks, upgrades give players reasons to return
- Keep it simple — one clear game loop executed well beats ten half-baked features
- Update regularly — new content keeps your player base active
- Listen to feedback — players will tell you what's broken and what they want
Build Faster with AI
Learning Roblox Studio is valuable, but it takes time. If you want a working game today, Obby generates complete Roblox games from text descriptions — scripts, 3D world, UI, and a ready-to-publish .rbxlx file. Use it to prototype quickly, then refine in Studio.


